
We recently posted some architectural photography on our social media channels with expectations that the images would probably not gain much traction. We were successful in capturing the architecture assignment extremely well. However, the subject was an elementary school, and frankly we didn’t think our social media fan base would react with such enthusiasm to that kind of content. The post was really well received and we were pleasantly surprised. Turns out we can make an elementary school appeal to the kind of folks that follow us. Since we had a few friends comment on the architecture photography that we posted. We decided to dish out some tips for the architectural photographer in Las Vegas.
Architectural Photography of E. W. Griffith Elementary School in Las Vegas Nevada, captured by Square Shooting.

Some of the biggest factors we consider as architectural photographers in Las Vegas are as follows:
- Time of Day
- Distortion Correction In Camera
- Focus
- Balancing Light
- Tidy Up and Shine It Up
Time of Day
This is the first thing we consider when photographing any architectural structures. The direction the building faces has a huge impact on what time of day we will photograph it. If the building faces West, we photograph the building at sunset, and if the building faces East, we capture the building at sunrise. Our favorite reason for shooting this way is golden hour. This happens right before the sun rises or sets, providing you with a nice warm open shade feel. This is lovely for architecture photography as it allows for the sky to act like a giant softbox. This will eliminate harsh shadows that the direct sun will cause. An added bonus of this technique is it can allow you to get some images in the direct sun, letting your images have two completely different looks.
If the building you are trying to capture faces North or South, well, consider yourself up a creek with no paddle. No, no, we kid. You have the choice of either sunset or sunrise and just have to use your best judgement. Our personal judgement, usually takes into account the fact that we are not a morning people. We like to ask ourselves if there is really a benefit to getting up at 4:00am to photograph this structure at sunrise. If no, then we would suggest sleeping in and grabbing some images at sunset. If yes, then hello coffee and a not so cheery disposition.
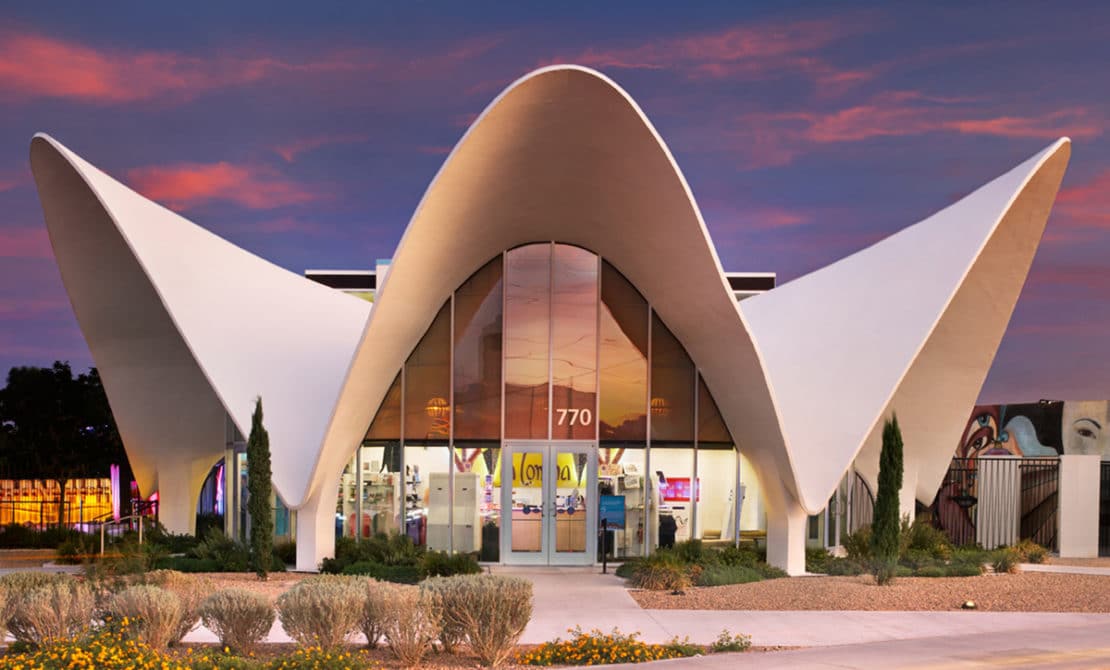 La Concha Motel – (Now repurposed as the Neon Museum’s Entrance) faces West and was photographed at sunset.
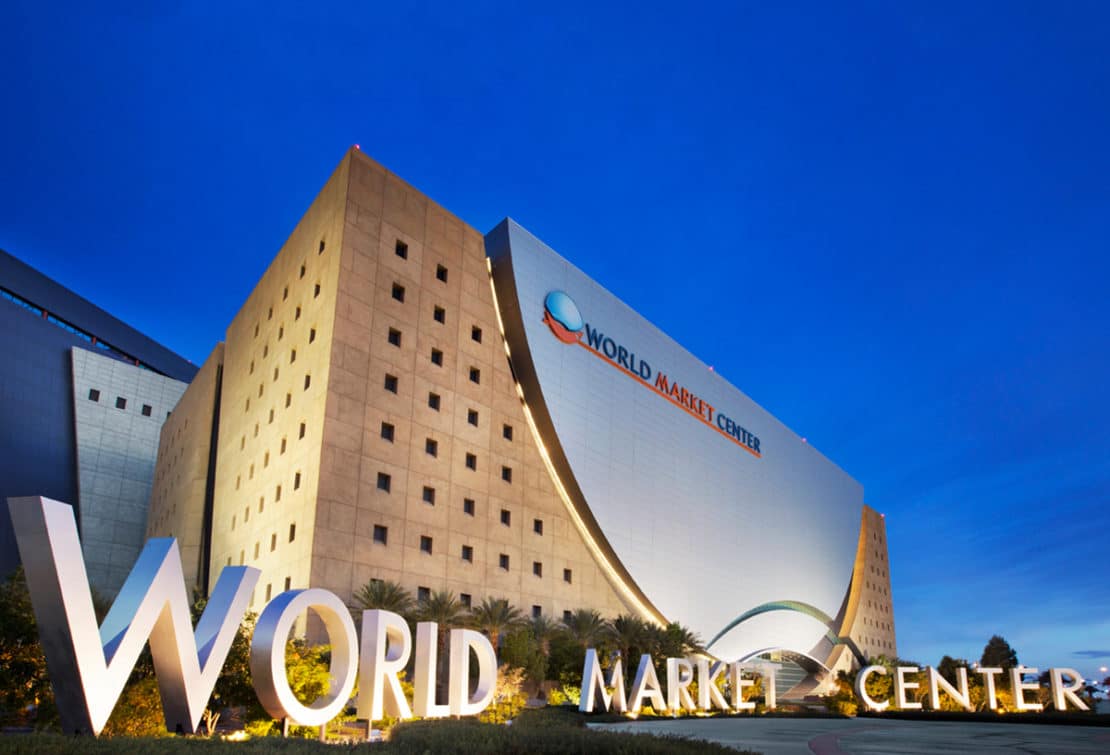 World Market Center faces East and was photographed at sunrise.
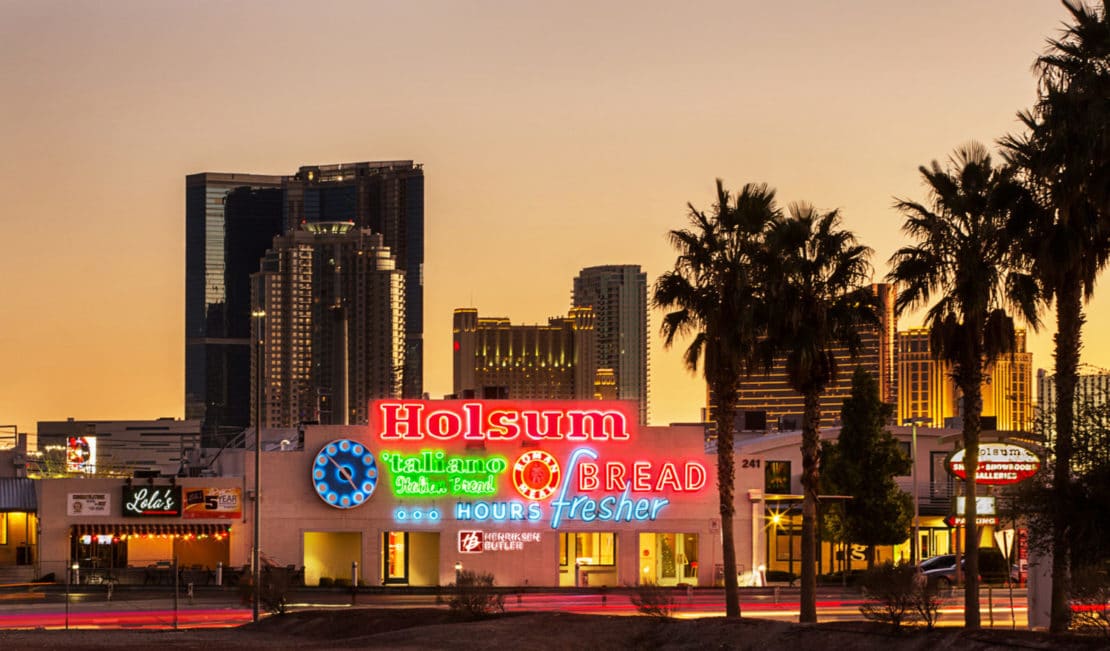 Holsum Lofts faces North and was photographed at sunset.
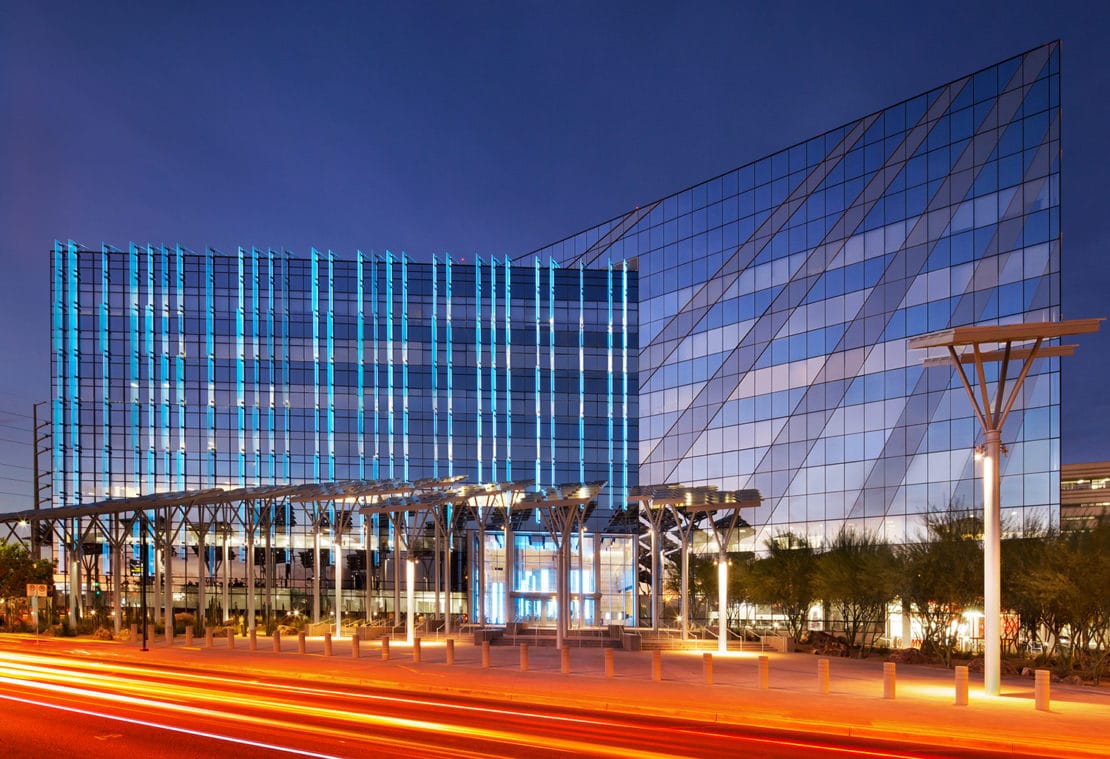 Architectural Photography of Las Vegas City Hall faces South and was photographed at sunset.
Distortion Correction in Camera
After you edit a few architectural photographs you will quickly learn some must do’s in camera. As an architectural photographer in Las Vegas distortion is the biggest issue we see in amateur and even some professional photographers work. If you want to set you work apart and have your architectural photography come across as a professional, then eliminate distortion during capture. We are not saying the tools in post can’t help or save an image. We have pulled off some amazing distortion correction in post when held to the fire. But why not start off with the best possible images from capture and save your time in post for the finishing touches?
Eliminating distortion in camera can be tricky, but once you know what to look for it becomes second nature. You will want to make sure your camera is parallel with your subject. You will need to make sure it is at a 180 degree angle in front of the subject. The camera should be completely level, check the levels on your tripod to make sure of this. Your camera should have no tilt up or down, nor be panned left or right. Any bit of twist or turn can distort your images.
If the building is too tall for you to capture without tilting upwards, you may want to look into a boom lift or a tilt-shift lens. The tilt-shift lens is our preferred method because it is usually easier to rent than a scissor lift or boom lift. It also allows for less camera shake or movement if you are shooting multiple exposures. So do us a favor and ditch the distortion and set your self up right. Upright with no distortion that is.
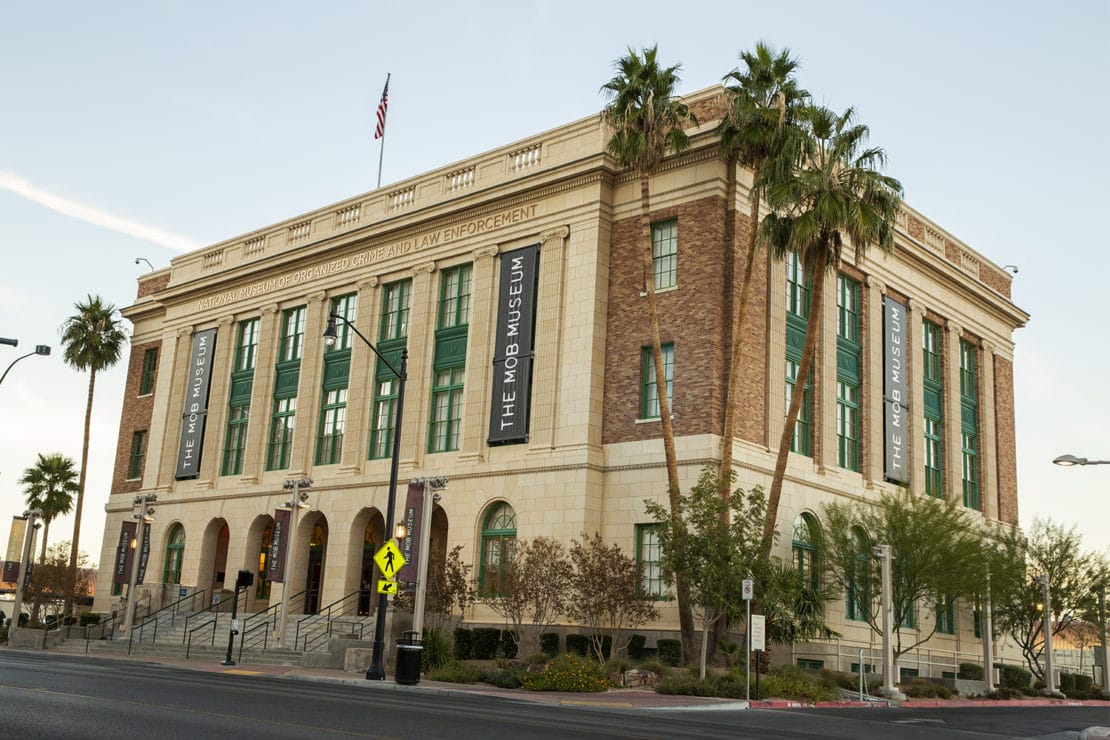 Architectural Photography of Mob Museum – Unedited & Distorted (Captured without tilt shift, not fully leveled and centered in camera)
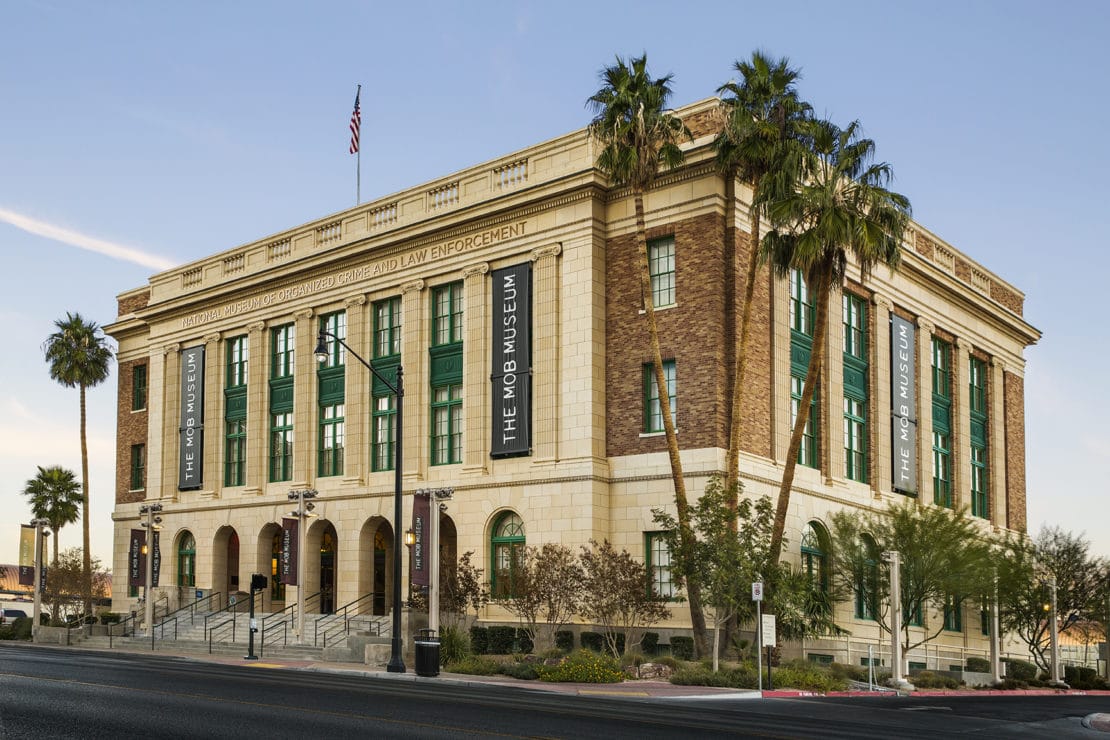 Architectural Photography of Mob Museum – Distortion corrected in post
Focus
On the majority of our architectural photography assignments in Las Vegas we are not shooting anything with less than F/18 aperture. It is very rare, but does happen occasionally, that we may want some blurred foreground to an entrance way. To accomplish this we would drop down to a shallow depth of field in the lower F-Stops. Generally for the hero shot of the building we want everything to be tack sharp on the structure, so we shoot with high apertures. In order to shoot with a higher aperture at sunrise or sunset, you will most likely be using some long exposures. The only easy way we know to capture a long exposure is with a tripod. As an architectural photographer in Las Vegas a tripod is just simply a must have.
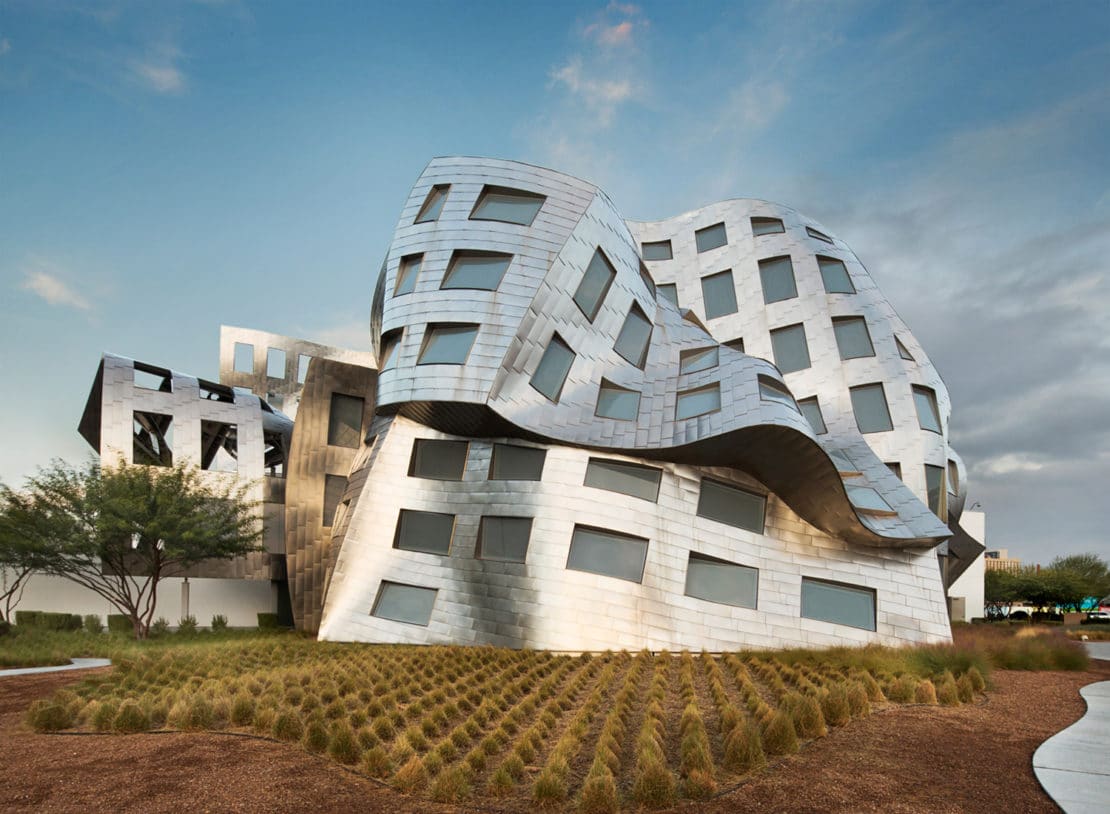 Architectural Photography Lou Ruvo Center for Brain Health captured at F/18
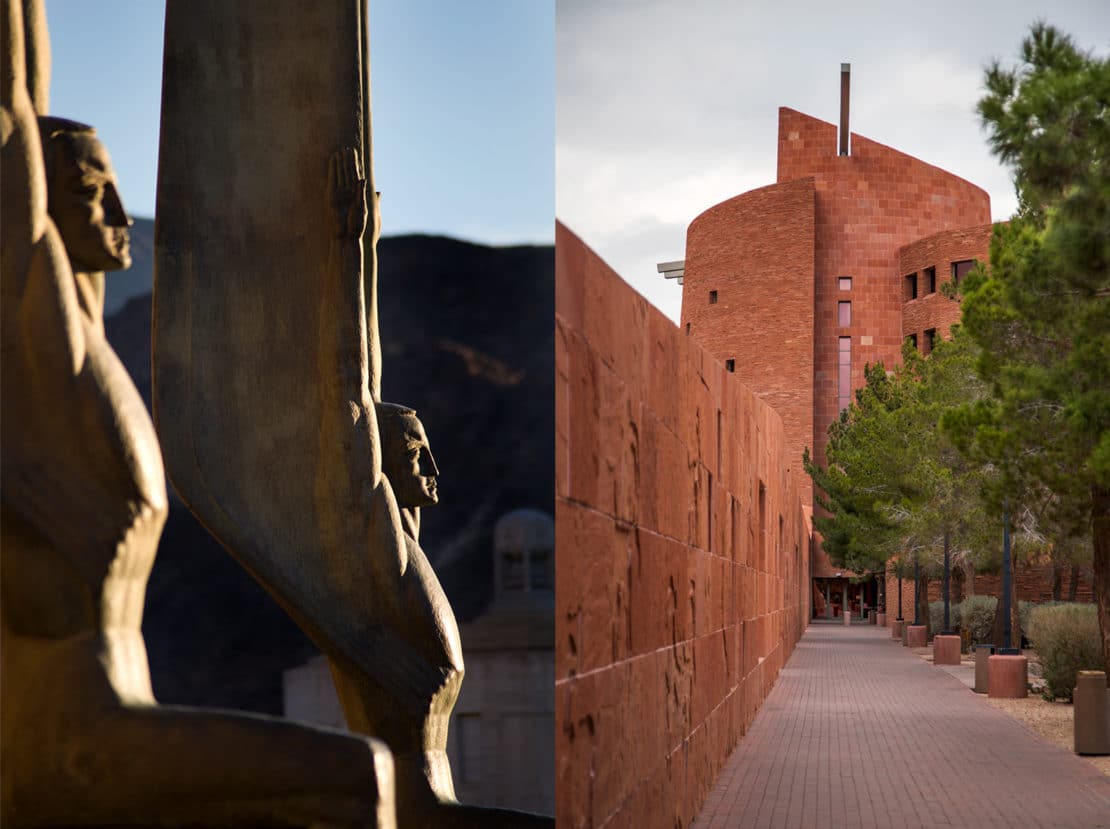 Left: The Winged Figures of the Republic at Hoover Damn shot at F/5.6 Right: Clark County Government Center shot at F/4
Balancing Light
This has already been covered a little bit, when we discussed the best time of day to capture an architectural image. We covered the different times which are sunset or sunrise, and how these would affect the balancing of light between the building and the sky. There is also another balancing of light that we would like to cover. Those are the lights in the building or on the building.
Lights used to light a room or a parking lot are rated at a different temperature than the open shade available light that happens during golden hour. For this we would recommend taking an additional exposure for the lighting in or on the building so you can combine the images in post. Since you are using a tripod (because you are not a savage) you should be able to just shift your white balance for tungsten or fluorescent lights. Capture both proper color balanced images, one for the building and sky the other for windows and the parking lot lights. Then you can simply drop the second image on top of the first image in post. Using post software you can paint in the lights to make one cohesive image. If you want to bring your architectural photography up to a pro level, don’t have discolored interiors in your shot.
 Architectural Photography of Unbalanced light on the New American Home 2019
 Architectural Photography of Balanced lighting on the New American Home 2019
Tidy Up and Shine It Up
Now that your camera is on a tripod, it’s the right time of day, you have taken into account all the light temperatures, do us one more favor: look around. Do you see any orange construction cones? Is there trash in the parking lot? Are only half the lights on in the building? Is that a coyote eating a small baby in the corner? Just checking to see if we still have your attention, because that is the last tip we have; pay attention to the details. Clean up the parking lot, move that ugly trash can, turn on all the lights and for the love of humanity find a big stick and save that baby! These small details will help you to put out the best architectural photography possible.
There is a known trick in the architectural photography world, that if you are shooting a structure with a parking lot, to have a water truck wet down the asphalt right before you snap the shot. This will make the parking lot or driveway look clean and add a lovely reflection to your shot. These are the kind of finishing details we would encourage you to pay attention to in your architectural photography.
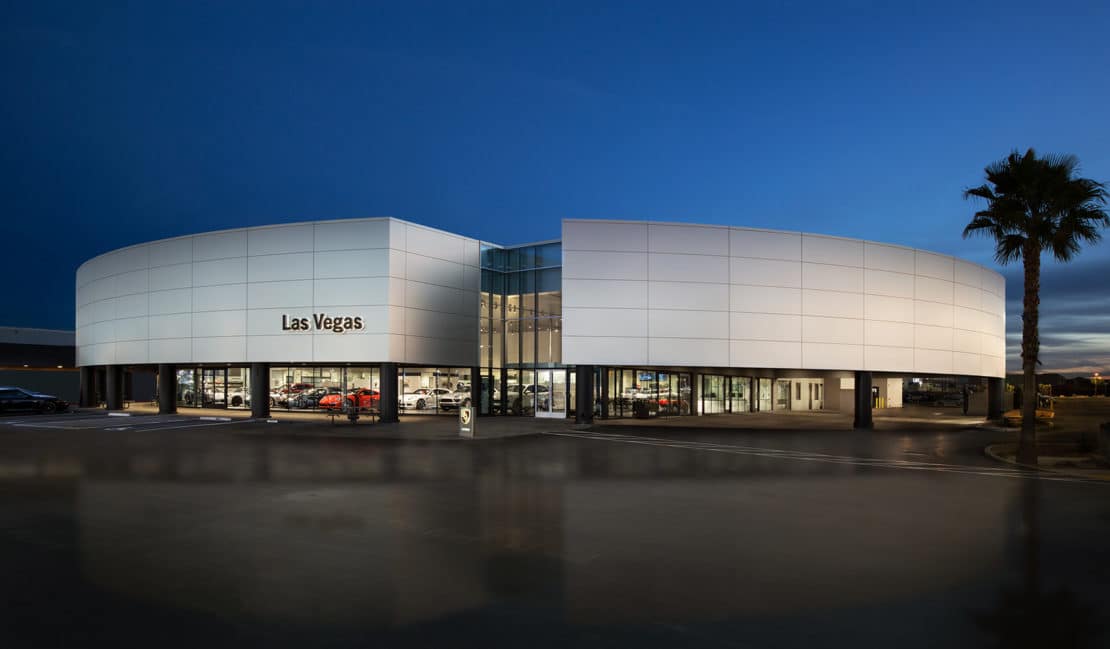 Architectural Photography of Gaudin Porsche of Las Vegas
Now You Are Set to be a Professional Architectural Photographer in Las Vegas
Well with all this new information you should now be able to take a killer architectural photograph that will make you look like a pro. If not, we enjoy job security, so yay us. We are just kidding again. If you still can’t quite grasp these techniques maybe ask to shadow or assist a professional photographer for free to see how they make the magic happen. Or for more information on the topic of architecture photography from less funny, but probably better writers, you can check out these additional links below.
http://www.archdaily.com/804685/10-tips-to-perfect-your-architectural-photography
http://www.adorama.com/alc/0014124/article/12-Steps-to-Success-as-an-Architecture-Photographer
http://fstoppers.com/architecture/seven-tips-taking-better-photographs-architecture-329881